


I first saw the Spotify Box project a couple of years a go, even before the Raspberry Pi was released to the market. Since then, I have been trying to replicate this idea of using physical objects to select the music that you want to listen.
After a couple of attempts, by the end of 2014, I was able to have a working version and it turned out to be very simple. Just a few lines of python code and usb connected hardware (not even soldering!). The idea is to use RFID cards that are associated to a Spotify URI to start playing a song, album, playlist, etc… in a Raspberry Pi.
So, here’s what you will need if you want to create your own version:
Hardware (~80 USD)
The connections are pretty obvious. Just connect the RFID reader to the USB port and the sound card too.
Software
To handle the connection to Spotify, I use the image from Pi Musicbox. You can follow the instructions in their website to install the image to the Raspberry Pi. Remember to enable the SSH connection in the settings. Now, if you want to use another board (Beagle Board Black, for example), you can just install Mopidy, which is the base of Pi Musicbox. It creates a music player daemon (MPD) and a web server, so it also provides a web interface to control your music.
To read the cards and control the MPD, I wrote a script that can be found here. The dependencies are listed there. First run ‘python config.py’ to configure the card reader. Then run the script called add_cards.py, where you can assign an Spotify URI to a card number using the reader. You can get the Spotify URI in the Spotify desktop app by right-clicking any song, album, playlist or radio station that you want. After adding some cards and playlists, run ‘python box.py’ and you are all set. All the code is open source and you are more than welcome to contribute!
Last thing is that you may want to include the script box.py to the startup. You can do so by following this tutorial for example.
If you have any questions, comments or improvements I am more than happy to hear them!

Inmediately after finishing my first bluetooth speaker, I started thinking about the second version. The first time I used laser cut MDF and this time I wanted to try a different material. I have a 3D printer at hand, so I decided to use it. Although I have use the 3D printer many times, I thought I would spend most of my time designing the speaker and printing it would be easy. But I was wrong. I had to print the speaker like 3 times and I can say that post-processing took longer than the laser cut speaker sanding and painting process.
Design
My design is inspired by an old Braun speaker designed by Dieter Rams. The idea is the same, but I made some modifications to make it work with the electronics and to be 3D printed.
I wanted a very clean and minimalistic interface, so I put a lot of effort to reduce the process of turning on the speaker to one operation. In my previous speaker, first you need to turn on a switch to power it on and then you need to hold a button for 3 secs. to turn on the bluetooth module. And besides a little bip, it provides no feedback about the current state of the speaker. So now, using a rather simple and inexpensive circuit I was able to use only switch equipped with a LED inside to turn on the system. I also added volume buttons that are really useful.
You can find the STL files here.
3D printing

As mentioned earlier, 3D printing was the hardest part of this project. After finishing the design, I left the Makerbot Replicator printing the whole body while I was sleeping. The next morning I was really excited to see the result, but I found a warped piece, split in 3 parts.


In the second attempt I split the body in two halves, but the curling persisted. So, in the third (and last) attempt I divided the body into 6 slices. This approach meant that the printing was much slower (I had to print 6 raft layers instead of one) and the post-processing took much longer, because I had to sand and bond each of the slices. But, at that point, it was the only safe way to do it. It would be nice to try PLA instead of ABS. Maybe all these problems are solved by switching materials. Removing the support material also took much longer than I thought. There was plenty of it on the outer surface and I must remove it really carefully, trying not damage anything. Finally I applied some layers of white spray painting.

Electronics
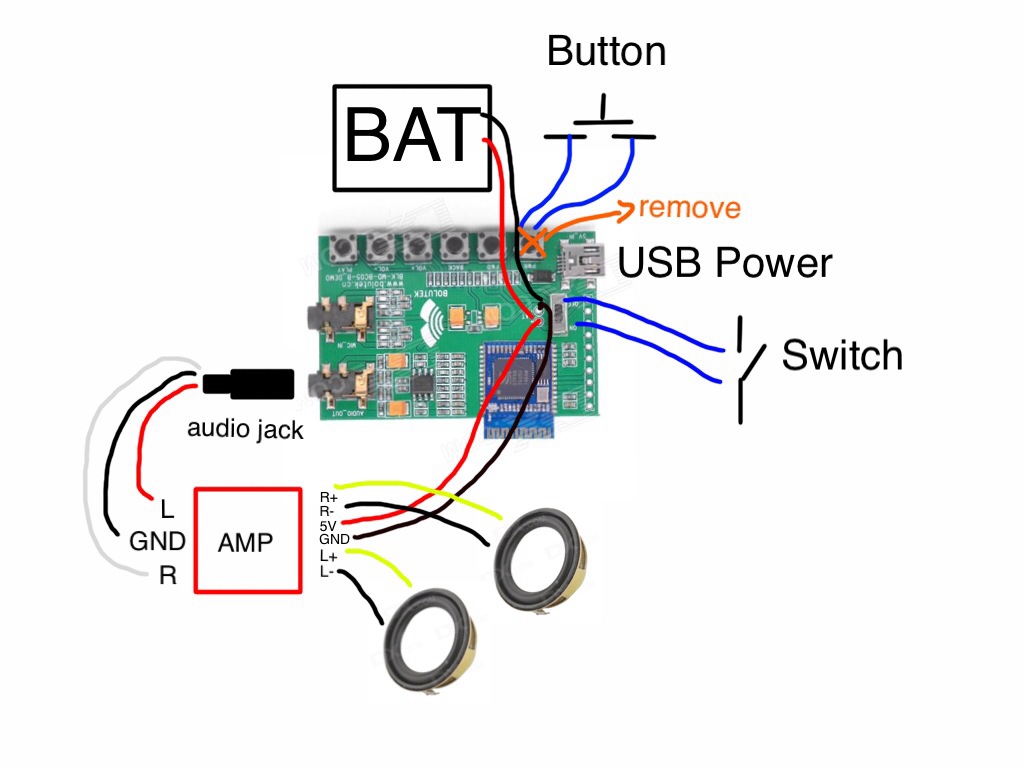
The electronics are rather simple and similar to my previous post. The main difference is that I used a module that integrated the bluetooth receiver and the amplifier. This is really nice because it decreases the noise considerably. As I mentioned above I also included this circuit (the diagram on the right) to avoid waiting for 3 secs. and to turn on the module with the same switch that I used to power the whole system. To achieve the time needed I changed the 22 uF capacitor to a 100 uF capacitor.
Here is the list of materials. If you have any question about the specifics, don’t hesitate to ask!
This is a project I finished a while a go, but I never had the time to post it. It is about this bluetooth speaker that I made using a laser cutter, some wood glue, spray painting and some electrical components that I bought on dx.com. There is no need to know much about electronics, you just need to plug the components to make it work and a little bit of soldering.

To build it you need to order the following parts from dx.com.
You can buy alternative components if you want, but these worked fine for me.
Then comes the laser cutting. I used 3 mm MDF for the structure and 1 mm balsa wood for the coverings. I sent the following files to a company called Idea Láser in Santiago, Chile to make the cuts.


There are some duplicated parts in case something goes wrong.
Once you have the wood cut, you can start assembling the body. You will also need a 4 mm circular wood stick of around 50 cm long. Now you have to build a 2 stacks with the side parts and wood glue, using the wood stick as a guide. Each stack should have 20 side parts.

Then you need to glue the upper and lower covers and the rings. To give some structure and make the gluing process easier you can use the front and rear covers.

 After that you will have to use sand paper to make the outer surface smooth, because is very likely that the MDF parts were not exactly 3 mm thick. Then you are ready to paint. I used white spray painting and I painted it around 3 times.
In the meanwhile you can glue the balsa wood front and rear covers to the corresponding MDF parts.
The electronics are rather easy, just basic soldering. You can see the connections in the diagram. The hardest part would be to remove the power button and bypass the power switch. To turn on the BT module, you need to press the power button for around 3 secs, after the power switch was turned on. Since this button is normally closed, you need to remove it and replace it with another one that you action from the outside. Also, you need to control the power switch from the outside, so solder an external and bigger switch. Solder both parts from the bottom of the board. Before you do that, make sure you made the appropriate holes in the back cover and install the button and the switch. You can make these holes with a dremel or, even better, you can include them in your laser cutting files.

When your circuit is ready (test it first) glue the speakers to the MDF front cover. I used super glue for that. You can also glue the modules to the Speaker.
Now your speaker is ready! If you have any comments or questions feel free to ask! I know there is room for improvement (I am already working on the second version) and I would love to hear your suggestions!
Debido a la poca información que encontré para planificar este viaje, decidí escribir este artículo que tiene la mayor cantidad de información relevante para que otros también puedan conocer este increíble pedazo de Chile, que aún no se ha desarrollado completamente en lo turístico.
Este trekking une el río Cochamó con el río Manso por la cordillera, acompañado de lagos, ríos y bosques de alerce. Está pensado para hacerlo entre 6 y 8 días dependiendo del clima y del estado físico de los participantes.
Partimos a las 2:40 AM desde Santiago rumbo a Cochamó. Después de varias horas de manejo sin mayores sobresaltos, nos salimos pasado Osorno hacia Puerto Octay. Pasamos por Cascadas, bordeando el lago Llanquihue y cruzando el Parque Nacional Vicente Pérez Rosales. Finalmente llegamos a Ensenada a eso de las 3 PM y almorzamos en el restaurant “Toqui Ruca Toqui”, donde por $2.000 se come un gran plato de papas fritas con salchichas. Luego de echar bencina, comprar las últimas cosas que faltaban y sacar plata (no hay más cajeros), seguimos hacia Cochamó. Después de un par de horas llegamos. En el puente paramos a hacer las últimas llamadas por celular, ya que después se pierde la señal por todo el paseo, y nos internamos con el auto bordeando el río Cochamó por unos 6 km. Aquí es donde dejamos el auto, este lugar cuenta con un camping y por $1.000 diarios se puede estacionar. Después de dividir las cosas partimos caminando a eso de las 6:30 PM.

En el camping nos advirtieron que era muy tarde para hacer el camino hasta La Junta (4 horas), pero que podíamos quedarnos en el río Piedras, que distaba a sólo una hora caminando. Y así lo hicimos, armamos la carpa en una pampa que había, al borde del río, e hicimos fuego, comimos y a dormir.
Dormimos 12 horas, ya que necesitabamos reponernos del viaje en auto, en el que casi no pudimos dormir. Después de desarmar campamento, partimos a eso de las 1 PM hacia la Junta. Después de caminar un poco más de 3 horas por una sendero con bastante barro llegamos al Camping La Junta, que es el lugar con más gente que uno pasa durante el paseo. Como nos habíamos atrasado el día anterior, necesitabamos recuperar un día. Es por esto que dejamos las mochilas en el Camping y partimos a eso de las 4 PM a subir el mirador Arcoiris. Esta es la caminata más diferente de todo el paseo, ya que es subir un cerro entre medio de bosques y en algunas partes escalando rocas con la ayuda de cuerdas. Después de unas dos horas y media llegamos al mirador arcoiris, un lugar con una vista impresionante, donde se ven muchos de los cerros cercanos, y también se ve el Estuario de Reloncaví. El paseo continúa hasta la cumbre del Cerro Arcoiris, aproximadamente una hora más, pero nosotros en virtud del tiempo volvimos al campamento. La bajada nos tomó cerca de una hora y media, ya que tiene su dificultad.


Llegamos al campamento a las 9 PM, armamos la carpa y fuimos a cocinar al fogón que tiene el camping, donde se junta mucha gente.
En la mañana fuimos a los toboganes de piedra, que quedan a 10 minutos caminando del Camping. El lugar es increíble, para quedarse una tarde entera tirándose.

Nosotros teníamos que seguir camino a El Arco, por lo que volvimos al campamento, desarmamos todo y partimos. La caminata dura 6 horas, y hay que cruzar cuatro ríos. Sólo el río Valverde tiene una pasarela, los otros hay que ingeniárselas o cruzar caminando.

El camino va subiendo camino va subiendo no muy pronunciadamente entremedio de bosques de alerces. Finalmente llegamos al Arco, que es un arco de roca junto a una cascada. Después de cruzar el río El Arco hay un refugio público, pero por miedo al hanta preferimos alojar en una pampa cercana donde habían varias carpas más. Armamos la carpa, hicimos fuego, comimos y a dormir. Después de dos días de buen tiempo, se empezó a nublar.

Amaneció nublado. Desarmamos campamento y a eso de las 10 partimos caminando rumbo al lago Vidal Gormaz.

En algunas partes se recomienda alojar en el lago sin nombre, que queda a 4 horas por un camino que sube constantemente, pero nosotros decidimos hacer dos días en uno y seguir al lago Vidal Gormaz, que queda a unas 3 horas más, por un camino que mayoritariamente baja. Al cabo de dos horas de caminata se puso a llover, y no paró en dos días. Paramos a almorzar brevemente en el lago sin nombre, que probablemente sea muy bonito con un día despejado y seguimos.


Llegamos empapados a alojar donde la señora Amandina en el Lago Vidal, que nos facilitó el fogón para secar la ropa y cocinar y una pieza para dormir por sólo mil pesos por persona. También le compramos una pierna de cordero e hicimos un asado.


Nos levantamos temprano porque nos habían dicho que se podía cruzar el lago en lancha y ahorrarse una caminta de 3 horas. Para conseguir el bote fuimos a la casa de Caloncho, el hijo de la señora Amandina que tiene una radio para llamar a los dueños del bote. Después de esperar que nos contestaran y confirmaran. El viaje nos costó 25 mil en total y toma unos 45 minutos. Fue un poco tedioso porque seguía lloviendo y en el bote se va al descubierto. A eso de las 2 de la tarde estábamos al otro lado del lago y partimos caminando.
Nuestro objetivo era llegar río Steffen. Cerca de las 4 llegamos a río Torrentoso, donde nos advirtieron que no siguieramos porque ya era muy tarde, nos podíamos perder y además estaba lloviendo muy fuerte. Nos quedamos alojar ahí en la casa de Manuel. Nuevamente nos prestaron el fogón para secarnos y una pieza para dormir. También nos invitaron a cocinar en su cocina. La atención estuvo increíble, y sólo tuvimos que pagar 2 mil pesos.
Nos levantamos a las 6:30 porque el objetivo del día era llegar al río Manso y terminar la caminata. A las 9 ya estábamos caminando, había parado de llover. El camino hasta el río Steffen es muy bonito, va siguiendo el cause del río Manso. All principio se avanza por unas pampas rodeadas de bosques y después continúa subiendo y bajando para cruzar los 3 ríos.


Hay una subida después de uno de los ríos que le dicen la “cuesta del indio”, que a pesar de su nombre no resultó ser tan terrible. En río Steffen está la posibilidad de alojar, pero nosotros paramos a comer algo.

Seguimos caminando para enfrentar una de la partes las más duras del trekking. Para cruzar el río Steffen es necesario bajar una cuesta que debe bajar 100 o 200 metros, pasar un puente y luego subir una cuesta similar a la anterior, que parece que no se acaba nunca. Después el camino se mantiene por un tiempo en altura y luego comienza una bajada hasta la altura del río Manso, y permanece bordeando el río hasta el final. Llegamos a las 8:30 al río Palace que tuvimos que cruzar por el agua. Ahí hay un supermercado y cabañas para alojar. A nosotros no nos permitieron alojar ahí, y nos mandaron hasta el cruce con la carretera donde habían otras cabañas, que queda a media hora caminando. Tampoco pudimos alojar ahí y terminamos alojando en cualquier parte. En la noche volvió a llover.
Desarmamos la carpa para esperar el bus en el puente del río Manso, que pasa a las 11 AM. Mientras esperábamos aprovechamos de hacer dedo y nos llevaron hasta el lago Tagua-Tagua, donde hay una barcaza que parte a las 12 para llegar a Puelo. Después de casi una hora de viaje en la barcaza tomamos el bus hacia Cochamó, y en el mismo bus nos ofrecieron que una camioneta nos llevaría al lugar donde dejamos el auto por 6000 pesos.
Con el auto, regresamos a Puerto Varas para alojar ahí y al día siguiente volver a Santiago.
